| | New Tires - The process - Heavy w/Pictures |  |
|
+9Rusty Shovel dmmcd mvonhatten bigg Peterbuilt gatorfan chuckP Biglake motokid 13 posters |
|
| Author | Message |
|---|
motokid
Moderator

| | Subject: Re: New Tires - The process - Heavy w/Pictures Mon Apr 15, 2013 6:39 am | |
| - mvonhatten wrote:
- Nice write up! Love how clean your bike looks with white plastics and 0 stickers.
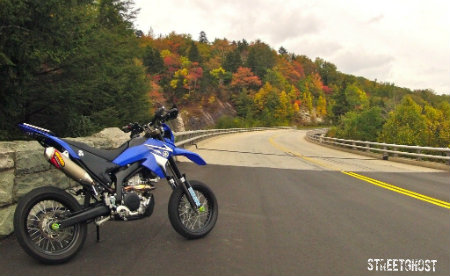
Thanks. Bought her like this  :  As I was looking at her yesterday after putting everything back together - I was thinking it might be time for some new paint. 
_________________
2008 WR250X
Gearing: 13t - 48t
Power Commander 5 / PC-V
Airbox Door Removed - Flapper glued - AIS removed
FmF Q4
Bridgestone Battlax BT-003rs
| |
|
| | |
dmmcd

| | Subject: Re: New Tires - The process - Heavy w/Pictures Mon Apr 15, 2013 8:55 am | |
| Nice write up. Good to have the spacer layout for future reference. I put a new set of BT-016 on last weekend. I mounted them myself, and I can tell you that putting the wheels back on the bike seemed like a piece of cake after mounting those tires on the rim... I did manage to get them mounted, but it wasn't fun. I only put about 5 miles on the tires so far, so I have no reviews yet. I put a 150 on the rear and it fits fine and clears the chain and everything.
Also you forgot to mention - Make sure you pump the brakes a few times BEFORE starting the bike after mounting tires. When you spread the pads, it takes a few pumps to get the pads back in place. It might not be as much an issue with new pads. Nothing worse than rolling to a stop and having no brakes for a few seconds. | |
|
| | |
Rusty Shovel

| | Subject: Re: New Tires - The process - Heavy w/Pictures Mon Apr 15, 2013 9:28 am | |
| Thanks for the write up Motokid. I just changed out my tires a few days ago; wish I'd read this first. I stuck with dirt tires (MT21 & D606). PITA to mount. I thought for sure something was going to bend or break while mounting the D606--very stiff sidewalls. I hear you about the difficulty of aligning and reinstalling the front wheel--too much movement from too many parts. I ended up enlisting the aid of a friendly neighbor. Those X tires sure look sleek.  Shovel | |
|
| | |
motokid
Moderator
| | Subject: Re: New Tires - The process - Heavy w/Pictures Mon Apr 15, 2013 9:38 am | |
| Yes - I always check brakes about a dozen times before ever starting the engine. spinning wheels while up on stand and using brakes pushing bike in driveway and using brakes never can check brakes too often when doing such things....
_________________
2008 WR250X
Gearing: 13t - 48t
Power Commander 5 / PC-V
Airbox Door Removed - Flapper glued - AIS removed
FmF Q4
Bridgestone Battlax BT-003rs
| |
|
| | |
Peterbuilt

| | Subject: Re: New Tires - The process - Heavy w/Pictures Mon Apr 15, 2013 10:30 am | |
| - bigg wrote:
- motokid wrote:
- Peterbuilt wrote:
- ! What kind of front pads did you get? Double sintered?
Sintered. Not sure about double? 
Double H sintered superbike pads is what the website says.
Part Number: FA142HH
what's the advantage compared to the stock pads? I'm quite happy with the stocks, especially their longevity. like yours mine still have a lot of life in them after nearly 12000 miles. sintered / double sintered provide more bite? Yea they provide extra braking I think compared to stock pads, but i'm also using the HEL stainless brake lines(which make a huge difference, does stoppies like right fuggin now!) As for tires, I'm running a 150 rear Bt003r.. Fits fine. | |
|
| | |
motokid
Moderator
| | Subject: Re: New Tires - The process - Heavy w/Pictures Mon Apr 15, 2013 10:53 am | |
| Aye - I had a 150 Distanzia on the back, and the chain never made contact.
I went back to the 140 to save some weight, and for the fact that a wider tire doesn't have any real benefits for me.
I'd rather use all of a 140 than 90% of a 150.
I got the 150 Distanzia because I could not get it in 140.
_________________
2008 WR250X
Gearing: 13t - 48t
Power Commander 5 / PC-V
Airbox Door Removed - Flapper glued - AIS removed
FmF Q4
Bridgestone Battlax BT-003rs
| |
|
| | |
oic0

| | Subject: Re: New Tires - The process - Heavy w/Pictures Mon Apr 15, 2013 2:16 pm | |
| I wish 140s were more common. Heck, a 150 probably costs us around 1hp worth of acceleration. Thats a lot when you've only got about 26 to begin with lol. I've got a pilot road 3 on the rear (150/70ZR-17 it hits the chain guard but not chain), its wearing line iron and a great tire... if only I could have gotten it in 140. | |
|
| | |
gatorfan

| | Subject: Re: New Tires - The process - Heavy w/Pictures Mon Apr 15, 2013 4:08 pm | |
| Here's some tips for tightening the forks.
Tips | |
|
| | |
motokid
Moderator
| | Subject: Re: New Tires - The process - Heavy w/Pictures Mon Apr 15, 2013 4:13 pm | |
|  No..... With no front wheel between the forks, the lower sections will free spin (except the one with the brake caliper). The handle bars will swing side-to-side and the fork tubes will individually spin around themselves.....then with the little spacers falling off and tight clearance for brake disk....  Having an extra set of hands around would be the greatest help, but given time and enough head-beating one person can do it.
_________________
2008 WR250X
Gearing: 13t - 48t
Power Commander 5 / PC-V
Airbox Door Removed - Flapper glued - AIS removed
FmF Q4
Bridgestone Battlax BT-003rs
| |
|
| | |
gatorfan
| | Subject: Re: New Tires - The process - Heavy w/Pictures Mon Apr 15, 2013 4:26 pm | |
|
Last edited by gatorfan on Mon Apr 15, 2013 4:40 pm; edited 1 time in total | |
|
| | |
motokid
Moderator
| | Subject: Re: New Tires - The process - Heavy w/Pictures Mon Apr 15, 2013 4:30 pm | |
|
_________________
2008 WR250X
Gearing: 13t - 48t
Power Commander 5 / PC-V
Airbox Door Removed - Flapper glued - AIS removed
FmF Q4
Bridgestone Battlax BT-003rs
| |
|
| | |
nyc_bob
| | Subject: Re: New Tires - The process - Heavy w/Pictures Mon Apr 15, 2013 11:25 pm | |
| - gatorfan wrote:
I know ... I've been there. All I'm saying is once the wheel is on there is more to it than just cranking down the bolts. Yeah, I just put on some new Pilot Powers. Putting the front wheel back on was like playing wack-a-mole, just too many moving and loose pieces. Eventually got it done single handed but next time I'm enlisting one of the kids. Motokid, thanks for the visual guide with the spacers, I had to go to the parts diagram a couple times to make sure I got them right after dropping them. | |
|
| | |
motokid
Moderator
| | Subject: Re: New Tires - The process - Heavy w/Pictures Tue Apr 16, 2013 5:38 am | |
| Gatorfan - yesterday after I read the link you posted I went out and loosened my pinch bolts and did the wheel spinning hit brake thing a whole bunch. Then re-tightened everything. Can't tell if anything changed, but if anything improved it's appreciated. So initial thoughts on tires and brakes. Tires. Wow. Barely have to think about turning and the bike is there. I've only run about 15 miles on them so far, and generally taking it easy until I know I've scuffed off the mold-release and sticker adhesive, but I'm pretty damn sure I made a great choice so far. The brakes. These babies stop heaps better than the stock pads I had. It's very evident that less pressure on lever gives me more stopping power. Again, I'm not even really confident I've ridden bike enough to consider the pads "broken in" or seated yet - but I can surely feel a much better response from the moment I start to squeeze the lever. Hopefully this coming weekend I'll get out for a joy ride and start working in the edges of the new tires. Right now I've also got the psi in both tires pretty high (in my mind) at about 28. You guys with BT-003's - where's your sweet spot for sporty riding regarding psi in your tires?
_________________
2008 WR250X
Gearing: 13t - 48t
Power Commander 5 / PC-V
Airbox Door Removed - Flapper glued - AIS removed
FmF Q4
Bridgestone Battlax BT-003rs
| |
|
| | |
gatorfan
| |
| | |
motokid
Moderator
| | Subject: Re: New Tires - The process - Heavy w/Pictures Fri Apr 19, 2013 5:51 am | |
| Got caught in a fairly heavy and steady rain yesterday. I must say, the still relatively newish tires behaved quite well. Braked fine with no skidding and cornered well too. I was by no means pushing anything as I've got less than 100 miles on tires still and with an MX helmet and goggles going "fast" in the rain sucks. I was content to go the speed limit and for all intensive purposes the BT-003's were predictable and solid at those speeds in the rain.
_________________
2008 WR250X
Gearing: 13t - 48t
Power Commander 5 / PC-V
Airbox Door Removed - Flapper glued - AIS removed
FmF Q4
Bridgestone Battlax BT-003rs
| |
|
| | |
pbnut

| | Subject: Re: New Tires - The process - Heavy w/Pictures Fri Apr 19, 2013 1:07 pm | |
| It's been so long since I messed with the bike that I can't recall what pressures I've been running.
I picked up new brake pads as well, and your praise for the new pads has me even more excited to replace them.
Sadly, I won't be doing much of anything for a while. Broke myself again only four days home from deployment... | |
|
| | |
gatorfan
| | Subject: Re: New Tires - The process - Heavy w/Pictures Fri Apr 19, 2013 5:16 pm | |
| OT Moto, you recently asked if my repacked muffler was noticeably quieter. Answer >> Yes. | |
|
| | |
motokid
Moderator
| | Subject: Re: New Tires - The process - Heavy w/Pictures Fri Apr 19, 2013 5:21 pm | |
| - gatorfan wrote:
- OT
Moto, you recently asked if my repacked muffler was noticeably quieter. Answer >> Yes. Sweet. Mine should hopefully get repacked this weekend. Pictures to follow of course.  Also - after a few google searches I've found most people are running BT-003's right around where I have them set. 28psi front and rear.
_________________
2008 WR250X
Gearing: 13t - 48t
Power Commander 5 / PC-V
Airbox Door Removed - Flapper glued - AIS removed
FmF Q4
Bridgestone Battlax BT-003rs
| |
|
| | |
gatorfan
| |
| | |
motokid
Moderator
| | Subject: Re: New Tires - The process - Heavy w/Pictures Fri Apr 19, 2013 5:43 pm | |
|
_________________
2008 WR250X
Gearing: 13t - 48t
Power Commander 5 / PC-V
Airbox Door Removed - Flapper glued - AIS removed
FmF Q4
Bridgestone Battlax BT-003rs
| |
|
| | |
chuckP
| | Subject: Re: New Tires - The process - Heavy w/Pictures Sun May 05, 2013 11:17 pm | |
| Now that you've had some seat time since you initial review of the pads, how are they doing?
I want to quiet down my Graves exhaust. I'm sure it could use a re-packing (15k miles). Are certain brands of repacking material more quiet then others? | |
|
| | |
Evol

| | Subject: Thread necro....sorry Sun Mar 09, 2014 12:10 pm | |
| Now that you've used the BT-003's for a season, how would you compare them to your old Distanzia's?
On road: I would assume they are much stickier? How about in the rain?
Off road: How slippery are they? How are they cutting across grass fields? Dirt roads?
How's the tread life so far? | |
|
| | |
motokid
Moderator
| | Subject: Re: New Tires - The process - Heavy w/Pictures Mon Mar 10, 2014 5:30 am | |
| BT-003's are great. They are a true sportbike tire so whatever applies to where you would and wouldn't want to ride a sportbike applies to them on the X. Since I rarely ever get a chance to go off-road - I can't say how they are in those situations, but I'd guess horrible unless it's a pretty hard-packed off-road surface. If the grass is dry they'd probably be fine for a short-cut, but if the grass is wet........  In the rain they're fine. But I'm not a knee-dragger anymore either. So far tread-life is fine. I'd for sure buy them again.
_________________
2008 WR250X
Gearing: 13t - 48t
Power Commander 5 / PC-V
Airbox Door Removed - Flapper glued - AIS removed
FmF Q4
Bridgestone Battlax BT-003rs
| |
|
| | |
Sponsored content
| | Subject: Re: New Tires - The process - Heavy w/Pictures | |
| |
|
| | |
| | New Tires - The process - Heavy w/Pictures | |
|