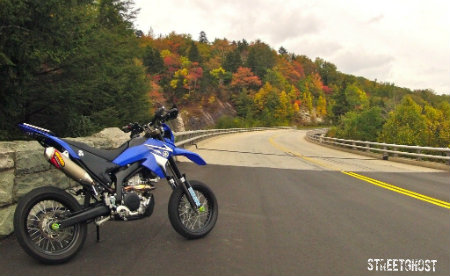
Welcome to the WRR/X Forum
Would you like to react to this message? Create an account in a few clicks or log in to continue.
Welcome to the WRR/X Forum

A place to share your passion for the WR250R/X!
 
HomeHome  Latest imagesLatest images  SearchSearch  RegisterRegister  Log inLog in  
WR250R/X Forum


 Let's see your bikes progression through pics.

Go down 
+6
wrxpro
little squirt
MotoKirby
SheWolf
YZEtc
trav72
10 posters
AuthorMessage
trav72

trav72


Let's see your bikes progression through pics. Empty
PostSubject: Let's see your bikes progression through pics.   Let's see your bikes progression through pics. EmptyTue May 24, 2011 10:31 pm

Lets see the history of your WR from when you first got it until now.

Here's mine:

The night I brought it home in October of 2010.
Let's see your bikes progression through pics. Img00011

The very next morning I took it on its first ride. The Hammer Run DS ride.
Before
Let's see your bikes progression through pics. Img00012

After. Second day of ownership and it had 2 bent foot pegs, 1 broken off and lost rear turn signal and a crumpled rear license plate.
Let's see your bikes progression through pics. Img00013

Let's see your bikes progression through pics. Img00015

Replaced stock foot pegs with WR450F pegs
Let's see your bikes progression through pics. Logan-12

I rode it like that for a few months
Let's see your bikes progression through pics. Img00014

Then decided to send the rear shock off to Go Race and had to test it out when I got it back.
Let's see your bikes progression through pics. Wrr_me10

Picked up a seatconcepts seat....
Let's see your bikes progression through pics. Before10

.....and a set of X wheels
Let's see your bikes progression through pics. After10

My first ride on the SM wheels
Let's see your bikes progression through pics. Img-2016

Then I got a great deal on a white rear fender, Pro Moto Billet Rack and Wolfman Peak tail bag.
Let's see your bikes progression through pics. Rack_f10

Let's see your bikes progression through pics. Logan-10

Then came the giant natural IMS tank
Let's see your bikes progression through pics. Ims-ta10

Painted the exhaust shield black
Let's see your bikes progression through pics. Logan-11

Ordered new white headlight and fender plastic
Let's see your bikes progression through pics. White210

That's where it stands now. Perfectly setup to perform double duty.
Let's see your bikes progression through pics. Img-2014

Let's see your bikes progression through pics. Logan-14

Well, since the original post there have been a few more changes. Here it is as of 9-23-11

I added a GPS, packed it up and took it on a little trip - 2200 miles in 4 days to the dragon
Let's see your bikes progression through pics. Dg110

Let's see your bikes progression through pics. Img_4210

Installed some doubletake mirrors
Let's see your bikes progression through pics. Logan-10

I lost the stock exhaust shield on my GYTR pipe so I ended up buying an FMF.
Let's see your bikes progression through pics. Fmf10

I put the old blue plastic, stock tank on and took off the lights for a track day.
Let's see your bikes progression through pics. Logan-12

Let's see your bikes progression through pics. Travis11

Let's see your bikes progression through pics. Travis12

Then I decided that the IMS tank was just to big for the type of riding I do. So I traded it for a white Safari
Let's see your bikes progression through pics. Woodla10

See how mach narrower the Safari is compared to the IMS.
Let's see your bikes progression through pics. Ims_sa10

That about brings me to where it is now.

Commuting
Let's see your bikes progression through pics. Willis10

Weekend
Let's see your bikes progression through pics. Woodla12


Last edited by trav72 on Fri Sep 23, 2011 10:46 am; edited 2 times in total
Back to top Go down
YZEtc

YZEtc


Let's see your bikes progression through pics. Empty
PostSubject: Re: Let's see your bikes progression through pics.   Let's see your bikes progression through pics. EmptyWed May 25, 2011 7:41 am

Ok.
I've got a few minutes before jerk.
I mean work. ;)
There wasn't so much evolving to my bike, just doing what I do to all of my just-purchased bikes, be they new or used, along with some choice mods I really feel the bike is begging for.

The evening I brought my 2008 WR-250X home this past December.
All stock except for a DRC taillight, aftermarket LED blinkers, and some 3rd grade-spec stickers on the fenders and acid trip paint stripes on the tires:
Let's see your bikes progression through pics. Wr-250xx120310

After I rode the bike three times before the weather got too cold for comfort, I started taking it apart in order to do the usual annual maintinance I give my street bikes, which is the same stuff my dirt bikes get, just with longer intervals.
The rear suspension gets a teardown for lubrication:
Let's see your bikes progression through pics. 121210wr-250xxservice002

It's easy to either forget or neglect (or both at the same time) all of those cute little bearings, spacers, collars, and oil seals in there working their little butts off so that you may have a functioning suspension under your ass:
Let's see your bikes progression through pics. 121210wr-250xxservice005

The shock, itself, was sent down to Mr. Go Race at Go Race Suspension in Virginia for his work on overhauling the innards of the unit.
Mine really needed it since it was actually leaking oil past the shaft seal.
No good.
Not only were the insides redone and revalved, but a softer rate spring was installed for my slim-and-trim 150 pounds:
Let's see your bikes progression through pics. 1229wr-250xxgorace

After the rear suspension was put back together, the steering head bearings got some love.
They weren't dry as a bone and desperately in need of grease, but, the point is to do it, do it correctly, and ride in peace knowing you did it and did it right:
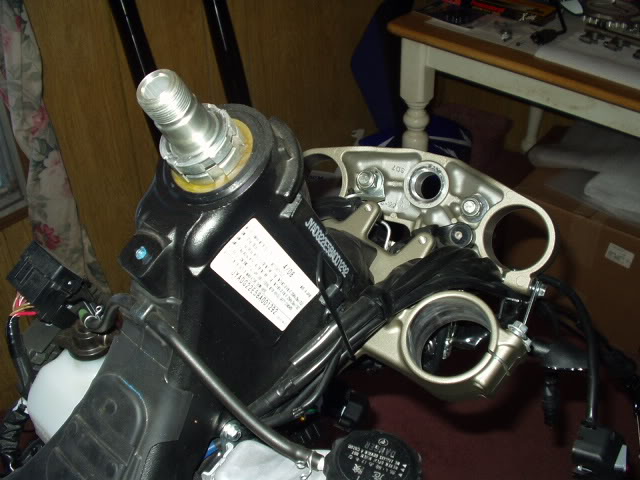
Let's see your bikes progression through pics. 010911wr-250xxsteering001

With the right tools, this is a pretty easy and straight-forward job:
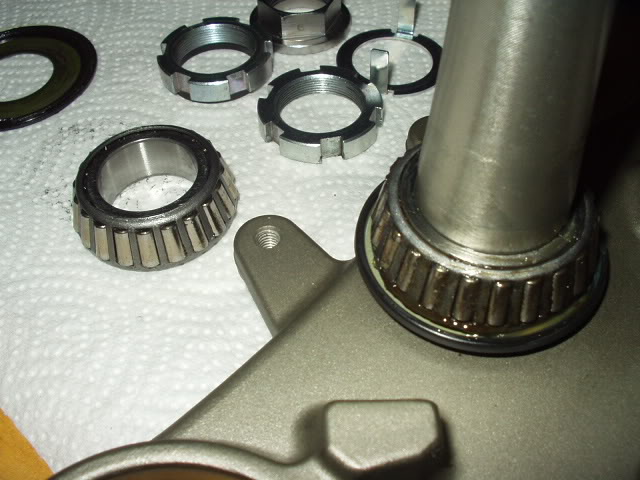
Let's see your bikes progression through pics. 010911wr-250xxsteering004

The front fork got an oil change to asssure the fluid in there was nice and fresh as a daisy.
I used the same oil as specified in the Service Manual:
KYB 01 fork oil, the good stuff.
Initially, I set the oil level to the stock 105mm.
After a few rides at the begining of this season, I lowered the level to 115mm to better balance the bike with the softer shock spring:
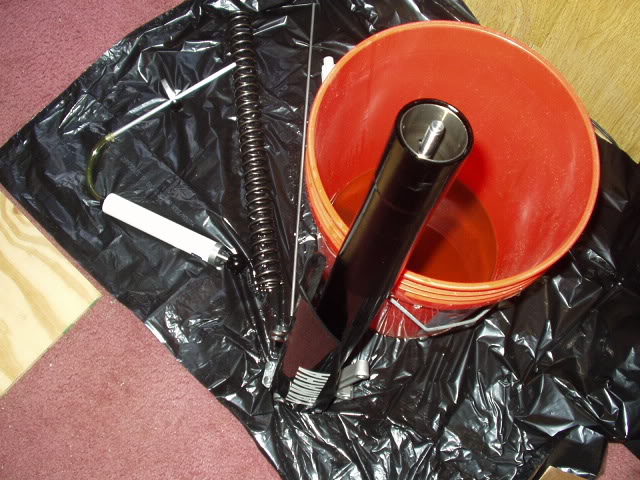
Let's see your bikes progression through pics. 010911wr-250xxforkoil

The fork oil used, along with one of the important mods added:
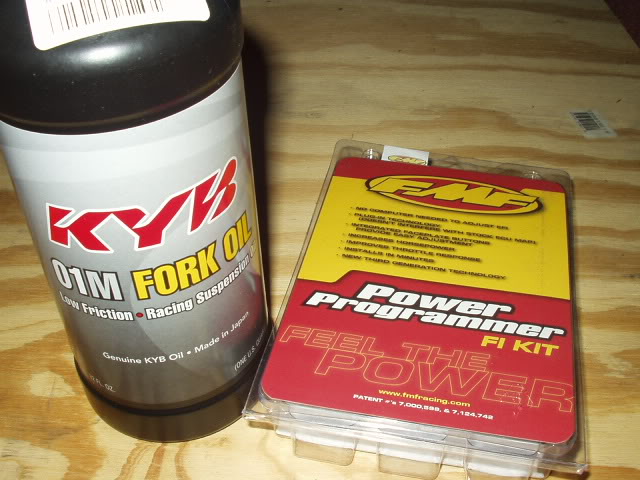
Let's see your bikes progression through pics. 010611wr-250xxstuff

Another of the mods done.
The airbox inlet is now a proper opening where the air can actually flow into the engine:
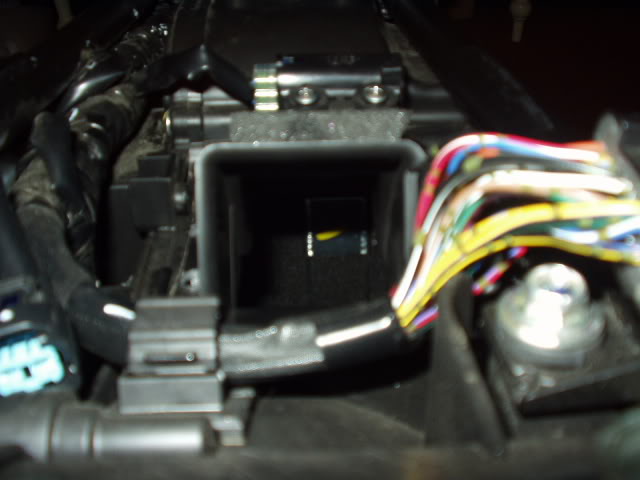
Let's see your bikes progression through pics. 010211wr-250xxairbox

Another biggie is getting rid of the rediculous tree-hugger moon gearing and installing something correct for the 250cc powerplant that moves the bike down the road.
I'm using 13/49 sprockets and a longer DID 520V chain with a rivet master link, thank you very much.
Advice:
Don't be scared of hearing the engine turn some RPM while going down the road.
It's not an 1,800cc Gold Wing, and never will be.
If you desire to have the bike practically idling down the freeway, it won't get out of it's own way when you want it to.
Unless you like that kind of stuff. ;) :
Let's see your bikes progression through pics. 010111twr-250xx1349sprockets

This shit it basically that - shit.
The ONLY reason the bike comes with it is to please some silly regulations that rate right up there with the world rapturing your ass on May 21st and Al Gore speaking the truth when ever he opens his private-jet-planed-around-the-world-while-you-are-told-to-conserve mouth:
Let's see your bikes progression through pics. 010911wr-250xxmuffler

Do you know that your brake calipers need to slide back-and-forth on little pins sealed by cute little rubber booties?
Yes, over time, the grease inside there will dry-up and need to be cleaned and lubricated:
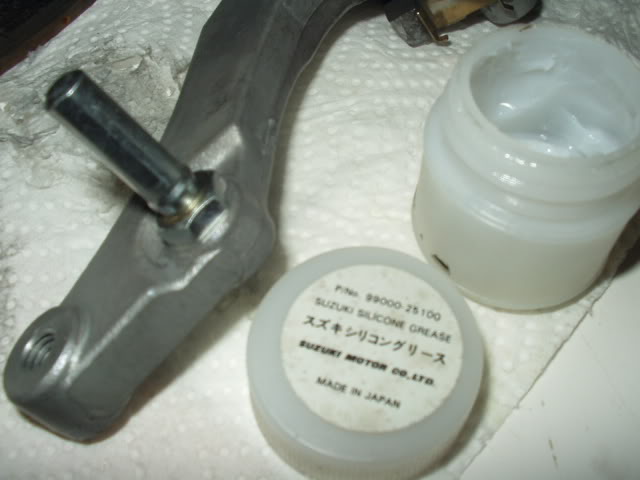
Let's see your bikes progression through pics. 010911wr-250xxfrontcalipergrease

Other mods done were the AIS bullshit removal, FMF Q4 muffler and Megabomb head pipe, 12 O'clock Labs speedometer recalibrator, 2009 model black OEM plastic, custom-made shroud graphics (that mimic the classic Yamaha "speed block" design as used on the 2006 50th Anniversary Edition Yamaha YZs), Graves Motorsports EXUP Eliminator, Yamaha OEM brushguards from a 2000 TT-R250M, black seat cover, and Michelin Pilot Power tires:
Let's see your bikes progression through pics. 042411wr-250xxmegabomb002

This is where I'm at and how she looks today.
It's a very fun and highty manouverable sport bike that can slice and dice and change direction like a guided missile.
The Michelin tires are magic, and the rebuilt shock actually works as you'd hope a 2008 suspension would work.
I'm pleasantly surprised at how good the front brake is (my past motard, a 2009 Suzuki DR-Z400SM, had a poor stock front brake), and, all-in-all, I'm very satisfied with the bike. :)
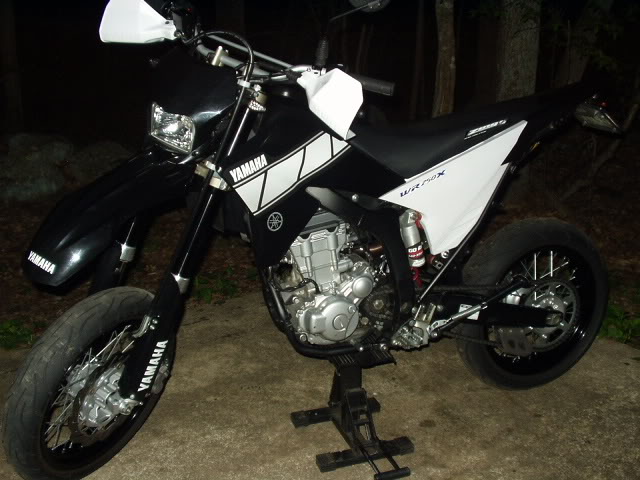
Let's see your bikes progression through pics. 050811wr-250xx002
Back to top Go down
SheWolf
Alpha Rider
SheWolf


Let's see your bikes progression through pics. Empty
PostSubject: Re: Let's see your bikes progression through pics.   Let's see your bikes progression through pics. EmptyWed May 25, 2011 10:21 am

Started out with this...omfg it was waaaaay too tall!
Let's see your bikes progression through pics. IMG_1146
Added this:
Let's see your bikes progression through pics. IMG_0814
and did this:
Let's see your bikes progression through pics. IMG_0813
threw on some of these 606's,
Let's see your bikes progression through pics. IMG_0820
and some cool barkbusters.
Let's see your bikes progression through pics. IMG_0818
Stuffed in one of these:
Let's see your bikes progression through pics. IMG_0824
Put on a set of these with some heated grips at the same time...
Let's see your bikes progression through pics. IMG_0854
and one of those...
Let's see your bikes progression through pics. IMG_0853
and this nice tidy setup...
Let's see your bikes progression through pics. IMG_0874
a purdy kickass skiddy-plate...
Let's see your bikes progression through pics. P1000471
and some numbers that didn't stay on very long...
Let's see your bikes progression through pics. IMG_0843
Rode around with this for a while.
Let's see your bikes progression through pics. IMG_0859
Added some more insurance:
Let's see your bikes progression through pics. IMG_0911
here too...
Let's see your bikes progression through pics. IMG_0905
as well as here
Let's see your bikes progression through pics. IMG_0916
and here.
Let's see your bikes progression through pics. IMG_0917
Got rid of those Mickey Mouse ears for a pair of these:
Let's see your bikes progression through pics. IMG_0907
This is the handiest thing ever!
Let's see your bikes progression through pics. IMG_0941
Made some quick adjustments...
Let's see your bikes progression through pics. IMG_0979
In my glory before the big stuff took place. Very happy
Let's see your bikes progression through pics. DirtyR
Ah yes...let it begin! POWER!!
Let's see your bikes progression through pics. IMG_0992
Gave it some more air doing this...
Let's see your bikes progression through pics. IMG_0993
and removed unwanted crap, resulting in using this to keep the CEL off:
Let's see your bikes progression through pics. IMG_1037
which was replaced a few days later with this:
Let's see your bikes progression through pics. IMG_1044
because it was for this!
Let's see your bikes progression through pics. IMG_1036
Got a new makeover! cheers
Let's see your bikes progression through pics. IMG_1049
Used these for a while.
Let's see your bikes progression through pics. IMG_0967
Gave it some more brightness.
Let's see your bikes progression through pics. IMG_1067
Something to keep the ass warm on cold rides.
Let's see your bikes progression through pics. Heatedseat
Made the seat a quick release:
Let's see your bikes progression through pics. IMG_1070
and got rid of the stock sprocket cover to use this:
Let's see your bikes progression through pics. IMG_1068
Got to do a photo shoot that ended up in DirtBike Magazine... wink
Let's see your bikes progression through pics. IMG_1139
Setup for adventure! thumb
Let's see your bikes progression through pics. IMG_1236
New skins again!
Let's see your bikes progression through pics. IMG_1255
Much more control...
Let's see your bikes progression through pics. IMG_1263
Lowered the stock seat...
Let's see your bikes progression through pics. IMG_1262
and added one of these.
Let's see your bikes progression through pics. IMG_1299
Should have done this waaaay sooner!
Let's see your bikes progression through pics. IMG_1312
Stuffed in one of these so my battery wouldn't drain... budah
Let's see your bikes progression through pics. IMG_0959
Another photoshoot that ended up in Yamaha Canada's 2011 dirtbike poster. wink
Let's see your bikes progression through pics. 90894430
More range for fuel!! cheers
Let's see your bikes progression through pics. C597e368
More comfy!
Let's see your bikes progression through pics. Cimg0015
Time to go to sleep now...
Let's see your bikes progression through pics. 63307bce

_________________
A wolf's voice echoed down the mountain 'Share the bounty of the hunt with your brothers and sisters, and forever be strong and free.' Let's see your bikes progression through pics. Wolf_b10
Back to top Go down
MotoKirby


Let's see your bikes progression through pics. Empty
PostSubject: Re: Let's see your bikes progression through pics.   Let's see your bikes progression through pics. EmptyWed May 25, 2011 6:19 pm

Shewolf, Where can I can those mirrors? I gotta have that!
Back to top Go down
SheWolf
Alpha Rider
SheWolf


Let's see your bikes progression through pics. Empty
PostSubject: Re: Let's see your bikes progression through pics.   Let's see your bikes progression through pics. EmptyWed May 25, 2011 7:33 pm

They are made by UFO. thumb Easy to get from any bike parts shop, or online.

_________________
A wolf's voice echoed down the mountain 'Share the bounty of the hunt with your brothers and sisters, and forever be strong and free.' Let's see your bikes progression through pics. Wolf_b10
Back to top Go down
little squirt

little squirt


Let's see your bikes progression through pics. Empty
PostSubject: Re: Let's see your bikes progression through pics.   Let's see your bikes progression through pics. EmptyThu May 26, 2011 12:27 am

i'll try to keep this as brief as possible Very happy

if you want to see it all check it out here: http://www.supermotojunkie.com/showthread.php?91034-*Project-Blue-Ballz*-My-WR250X-Build-Up-Thread


day 1


Let's see your bikes progression through pics. 12-1


Let's see your bikes progression through pics. 15-1


day ??

Let's see your bikes progression through pics. 25-1


Let's see your bikes progression through pics. DSC00006


day ???


Let's see your bikes progression through pics. Wr1

Let's see your bikes progression through pics. DSC00295


day ????
Let's see your bikes progression through pics. DSC01161


day ?????

Let's see your bikes progression through pics. F0a7b0cb


day ??????

Let's see your bikes progression through pics. DSC00410-1


day a what eva

Let's see your bikes progression through pics. 57cc0da9

Let's see your bikes progression through pics. 9ecd232d


Let's see your bikes progression through pics. C15c3ffb


Back to top Go down
wrxpro

wrxpro


Let's see your bikes progression through pics. Empty
PostSubject: Re: Let's see your bikes progression through pics.   Let's see your bikes progression through pics. EmptySat May 28, 2011 9:44 pm

loadssso of pics sorry 09wrx

Let's see your bikes progression through pics. IMAG0123

Let's see your bikes progression through pics. IMAG0124

Let's see your bikes progression through pics. IMAG0125

Let's see your bikes progression through pics. IMAG0171-1

Let's see your bikes progression through pics. IMAG0300-1

Let's see your bikes progression through pics. IMAG0695-1

Let's see your bikes progression through pics. IMAG0693-1

Let's see your bikes progression through pics. IMAG0718-1

Let's see your bikes progression through pics. IMAG0713-1

Let's see your bikes progression through pics. IMAG0724-1

Let's see your bikes progression through pics. IMAG0723-1 thumb thumb thumb thumb
Back to top Go down
DougZ

DougZ


Let's see your bikes progression through pics. Empty
PostSubject: Re: Let's see your bikes progression through pics.   Let's see your bikes progression through pics. EmptySun May 29, 2011 10:38 pm

I have only owned mine for a few months. Will update with mods another day. For now, where I started, stock and where it is at now.

Stock:

Let's see your bikes progression through pics. 2011-03-25_13-15-01_501

And now..mostly done.

Let's see your bikes progression through pics. Fmf1

OK, the mods:
Pirelli XCMH's with heavy duty tubes
FMF programmer
FMF Q4 pipe
Flatlands skidplate
Moose hand guards
Progrip 714 grips
HDB top clamp
Ivan's case saver
Double take mirror
12T front sprocket
Flapper mod
No Toil air filter

Removed stock crap:
stock mirrors
reflectors
rear passenger pegs
plastic side case things
AIS removed
EXUP Servo removed


Back to top Go down
SoupSandwich

SoupSandwich


Let's see your bikes progression through pics. Empty
PostSubject: Re: Let's see your bikes progression through pics.   Let's see your bikes progression through pics. EmptySun Jun 05, 2011 11:01 pm

My bike from day one until now......
Let's see your bikes progression through pics. 40672_149051508441514_100000099968486_487199_6266463_n
Let's see your bikes progression through pics. IMG_2698
Let's see your bikes progression through pics. IMG_2728
Let's see your bikes progression through pics. IMG_2968
Let's see your bikes progression through pics. IMG_1203
Let's see your bikes progression through pics. IMG_1201

Back to top Go down
foofighter

foofighter


Let's see your bikes progression through pics. Empty
PostSubject: Re: Let's see your bikes progression through pics.   Let's see your bikes progression through pics. EmptyMon Jun 06, 2011 9:31 am

Wow that red paint job look amazing! Did you spray bomb that yourself? Or is it professionally done?
Back to top Go down
SoupSandwich

SoupSandwich


Let's see your bikes progression through pics. Empty
PostSubject: Re: Let's see your bikes progression through pics.   Let's see your bikes progression through pics. EmptyMon Jun 06, 2011 11:13 am

foofighter wrote:
Wow that red paint job look amazing! Did you spray bomb that yourself? Or is it professionally done?

Thanks foofighter. Nope just used some spray paint for plastics and applied a bunch of coats. I was never really happy with how the white and black turned out but I very fond of the red...... its probably as close to a Ducati Hypermotard that I will ever get. :)
Back to top Go down
trav72

trav72


Let's see your bikes progression through pics. Empty
PostSubject: Re: Let's see your bikes progression through pics.   Let's see your bikes progression through pics. EmptyFri Sep 23, 2011 10:48 am

Lots of new members so I thought I would bring this thread back. I'm sure there are lost of people that can add to this thread.

I've edited my first post with the changes I made since I started this.
Back to top Go down
DougZ

DougZ


Let's see your bikes progression through pics. Empty
PostSubject: Re: Let's see your bikes progression through pics.   Let's see your bikes progression through pics. EmptyFri Sep 23, 2011 10:56 am

Shewolf...your stuff is a little over grown there....you may wanna trim it down a bit.

Let's see your bikes progression through pics. IMG_0820
Back to top Go down
ibusacap

ibusacap


Let's see your bikes progression through pics. Empty
PostSubject: Re: Let's see your bikes progression through pics.   Let's see your bikes progression through pics. EmptyTue Aug 07, 2012 11:13 pm

Day 1 bought it brand new and its so shinny
Let's see your bikes progression through pics. Img_0113
Day 2 took it up to the mountains and obviously I couldn't go to the one in the background cause there was still too much snow. Did try it in some snow it doesn't do very well.
Let's see your bikes progression through pics. Img_0115
Week 2
Designed the wrap for my bike then the template for the wrap, printed and stuck her on. I work at a sign shop so I have access to making vehicle wraps and it looks way better than anything I could find on the internet and its a flat color so its not shinny.
Let's see your bikes progression through pics. Img_0114
This is what the wrap looks like coming out of the printer.
Let's see your bikes progression through pics. Img_0117
Week 4
Got the shock protectors wrapped the mirrors and a little piece on the rack. I just added some new grips and hand guards good thing too cause I wrecked pretty good on the right side.
Let's see your bikes progression through pics. Img_0116
Week 6
Put on a 48 tooth rear sprocket so I had to go and try it out up in Idaho City. And I went everywhere the yz250f went even with the stock tires.
Let's see your bikes progression through pics. Img_0118
Some time later I'm guessing 3 months finally got a skid plate on there wish I would've put that on first.
Let's see your bikes progression through pics. Img_0210
Then I tested it out works pretty good slide over some pretty big rocks with it. I didn't bring my camera when I went to the top of Iron Mountain.
Let's see your bikes progression through pics. Img_0211
And now just added some Pirelli XCMH which is wish I would've had going up that huge mountain you saw in the previous picture.
Let's see your bikes progression through pics. Img_0212
Back to top Go down
Sponsored content


Let's see your bikes progression through pics. Empty
PostSubject: Re: Let's see your bikes progression through pics.   Let's see your bikes progression through pics. Empty

Back to top Go down
 
Let's see your bikes progression through pics.
Back to top 
Page 1 of 1
 Similar topics
-
» TimdogWR Pics pics pics
» Lets see pics of your R and X setups!
» WR250R/X Integrated Taillight
» Riders behind the bikes ... or how about on the bikes?
» Har-Dee-Har

Permissions in this forum:You cannot reply to topics in this forum
Welcome to the WRR/X Forum :: General :: WRR/X Pictures-
Jump to: