Welcome to the WRR/X Forum
Would you like to react to this message? Create an account in a few clicks or log in to continue.
Welcome to the WRR/X Forum

A place to share your passion for the WR250R/X!
 
HomeHome  Latest imagesLatest images  SearchSearch  RegisterRegister  Log inLog in  
WR250R/X Forum


 Lynx Fairing install, WR250X

Go down 
4 posters
AuthorMessage
Mr. Fisherman

Mr. Fisherman


Lynx Fairing install, WR250X Empty
PostSubject: Lynx Fairing install, WR250X   Lynx Fairing install, WR250X EmptySun Aug 01, 2010 2:11 am

So I was the lucky guy who got to get the first fairing in the wild. Ian has been great to work with.
I received my fairing just 3 days ago.

I got tired of looking out the window at each passing truck so ClappedR6 and I decided to go for a ride and wait for the package to arrive. My son was to text me when it showed up and we would head down from the hills to start the install. It was late in the afternoon. We had a great ride and we both dropped our bikes at least once so you know it was fun.
We headed for the barn and the much anticipated package was in fact waiting for our attention.

The first step was looking over the packing list and reading the instructions. Yea, I read them...
Removal of the existing fairing and front fender was simple.


Lynx Fairing install, WR250X 954198360_Kruzu-M-1

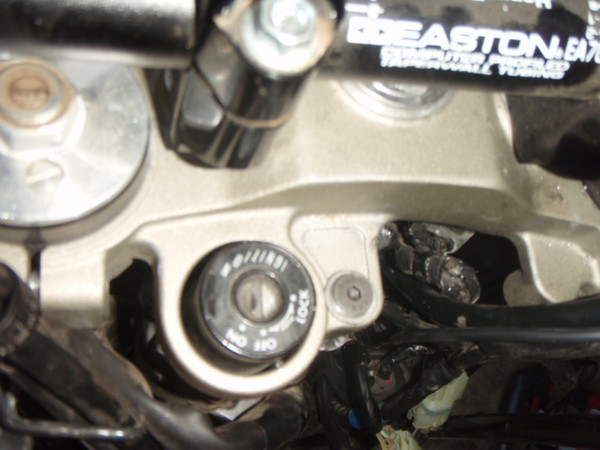
Next was to remove the existing bracket which included drilling out the tamper proof bolt in the ignition switch. If I had it to do over again I think I would have done what Ian did and just cut that piece of the bracket off with a dremel or similar tool. If you wanted to go back to stock it could be tack welded.
I was committed and drilled out the bolt. The problem is that it is about impossible to get a drill in there to drill out the bolt. It was almost impossible to get square on it from underneath and the drill chuck wanted to rub on the ignition switch so I drilled it from the top. If you do this add a washer to take up the space where the bracket was attached to prevent the bolt from cocking the housing.


Lynx Fairing install, WR250X 954198365_C5y9L-M

Next challenge was removing the two bottom bolts from the tripples... Sounds easy right? Only 2 nuts to remove and remember to catch the spacers and washers... For the life of me I could not get a wrench on those nuts. There just wasn't room and the tab on the frame prevented a socket from working. I will say I had help and we were both stumped and had long since run out of daylight. End day 1.

Before I went to bed I called another friend of mine as I had questions about the harness that was provided. I also wanted to know if he had any tricks for removing the tripples. He planned to come over in the morning to have a look.

Day 2, My friend Luke had the two bolts off before I could find my wrench. He had an offset wrench but also figured out that if you move the fork straight ahead to the 12 o'clock position you could just get a wrench on the nut. You could then turn the forks to get a longer swing on it to turn the nut then reposition the forks and repeat. Better than only getting one point at a time.

The next challenge was that the base of the dash sloped before the end of my risers. We solved this problem by filing the holes back at the base so they would sit flat.

Lynx Fairing install, WR250X 954198386_FH5kz-M


Lynx Fairing install, WR250X 954198403_hRgz7-M

I removed between 1/8" and 1/4" of material and checked for fit as I worked.

Next I noticed the washers provided for under the dash didn't quite get them over the top tripple which would have bound it just a bit so I added a washer for a total of 2 per side and it cleared just fine.

It is hard to see in this pic but you can just make out the daylight between the dash and the riser bolt and washer before the change. Not good.

Lynx Fairing install, WR250X 954198501_BKqGq-M

Getting the nuts back on was fun. On the left side there is a bracket. From the bottom it is bracket, washer spacer nut. The bracket faces the front preventing access and goes on first making it fun to add the washer, spacer then nut. Be patient and you will get it. Good times. Eventually I got it.

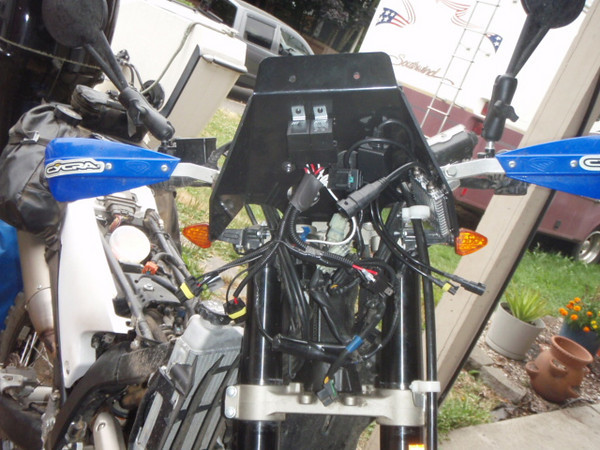
Next I installed the instrument panel. A tip for when you do this is to wait to secure it until you connect the cluster and slide the boot on and zip tie it in place then bolt it up. It is much easier than trying to do that this after it is bolted on. I also had to drill out the holes just a smidge to get it to fit.

Lynx Fairing install, WR250X 954198511_Etmdw-M

Next I ran the positive cable for the harness

Next mount the relays and ballasts.
Lynx Fairing install, WR250X 954198507_UUHGY-M

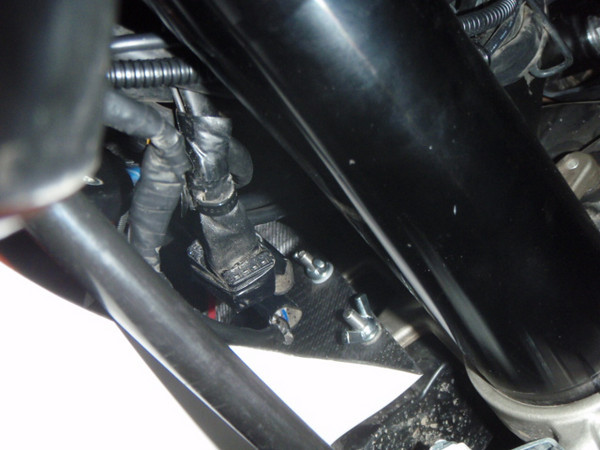
We decided to splice the short grounds together and run a wire all the way to the battery.
I had an older thick ballast but it mounted just fine.
I used the supplied screws to attach the relays and 3M industrial 2 sided tape to mount the ballasts.

Taped and zip tied the loose ends and tested it for fit. Tested the lights and buttoned it up. Success wings

The two front fender bolts are replaced with longer ones and nylock nuts. I replaced the nylocks with wing nuts and lock washers. I wanted it to be easier to remove in the field. I will keep an eye on them and may safety wire them if they loosen up. It is hard to get my big hands in there.

Lynx Fairing install, WR250X 954198622_AFDaZ-M

We adjusted the low beam a bit before I added the wing nuts to the front fender mounts.
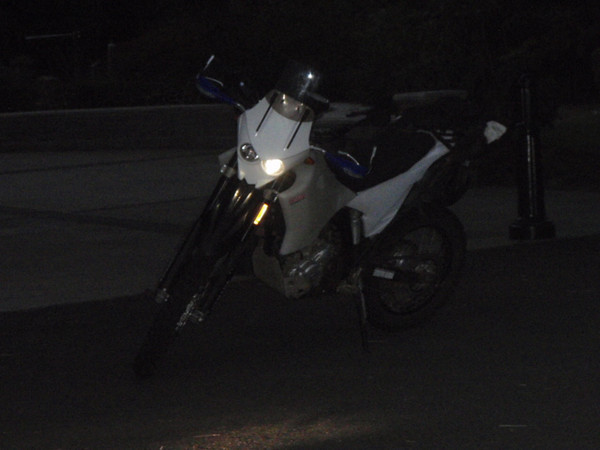
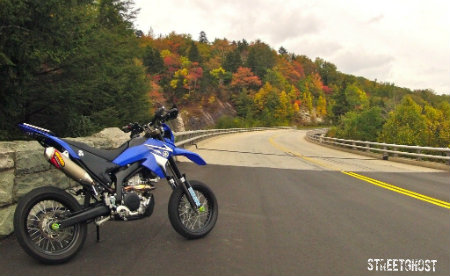
Took it for a spin!

I like how it cleans the air above 50 MPH with the screen all the way up which makes riding with my dirt helmet a breeze. It also greatly reduced the push against my chest. I like it.

It turned a lot of heads on the first ride. There was a guy checking it out when I came out of the hardware store with the lock washers and wing nuts.

It is a great product. I like it thumb thumb

Lynx Fairing install, WR250X 954198572_Fsxta-M

Lynx Fairing install, WR250X 954198597_5bSnv-M

Lynx Fairing install, WR250X 954198562_xKTyS-M

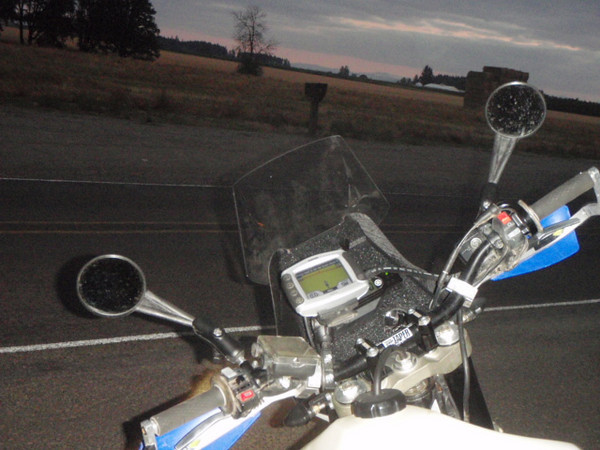
I still need to make a stand off or mount a RAM mount for my Zumo as the top lip and top bolts get in the way of the release. I will work that out later.

Back to top Go down
SheWolf
Alpha Rider
SheWolf


Lynx Fairing install, WR250X Empty
PostSubject: Re: Lynx Fairing install, WR250X   Lynx Fairing install, WR250X EmptySun Aug 01, 2010 10:33 am

Lynx Fairing install, WR250X 525406 Nicely done, Fish! I wonder how Ian got his mounted up with the use of what was supplied in the kit; if you had to add stuff like you did it makes me wonder what he all did. Kinda hard to understand what was done unless one was there to actually see how he did it. It looks badass tho; let us know how it is in the bush. Lynx Fairing install, WR250X 61865

_________________
A wolf's voice echoed down the mountain 'Share the bounty of the hunt with your brothers and sisters, and forever be strong and free.' Lynx Fairing install, WR250X Wolf_b10
Back to top Go down
Ian B


Lynx Fairing install, WR250X Empty
PostSubject: Re: Lynx Fairing install, WR250X   Lynx Fairing install, WR250X EmptySun Aug 01, 2010 1:19 pm

This was a good opportunity for me to see how someone else interpreted the instructions. The first issue is that Fish has aftermarket bars and risers and this is why he had to modify things a bit around there and also why he might have had issues removing the bolts from under the top tripple. Mine just came straight of with no problems, but its something for me to add in the instructions. The wing nuts on the bottom mounting are a great idea and I think we will go with that as standard in future, although we will include a lock washer as well.

I will also look at the poitioning of the speedo with reference to the Zumo. Many guys use this unit these days and it would be better to be able to fit it with its Garmin mount than having to spend more money on a special mount.

Thanks for the write up Fish - really helpful feedback Lynx Fairing install, WR250X 525406

Cheers Ian
Back to top Go down
Mr. Fisherman

Mr. Fisherman


Lynx Fairing install, WR250X Empty
PostSubject: Re: Lynx Fairing install, WR250X   Lynx Fairing install, WR250X EmptySun Aug 01, 2010 3:42 pm

Removing the tank helped too.


Last edited by Mr. Fisherman on Sun Aug 01, 2010 3:46 pm; edited 1 time in total
Back to top Go down
Mr. Fisherman

Mr. Fisherman


Lynx Fairing install, WR250X Empty
PostSubject: Re: Lynx Fairing install, WR250X   Lynx Fairing install, WR250X EmptySun Aug 01, 2010 3:44 pm

Thanks Ian. I did use lock washers on the wing nuts.
From what I read a lot of people upgrade the bars. I am glad there was enough material to open up the holes.
Now to put some miles on it.

We need to come up with a guard for the lenses.
Back to top Go down
Ian B


Lynx Fairing install, WR250X Empty
PostSubject: Re: Lynx Fairing install, WR250X   Lynx Fairing install, WR250X EmptyMon Aug 02, 2010 1:52 am

Mr. Fisherman wrote:
Thanks Ian. I did use lock washers on the wing nuts.
From what I read a lot of people upgrade the bars. I am glad there was enough material to open up the holes.
Now to put some miles on it.

We need to come up with a guard for the lenses.

We already have them. They are 40ml clear vinyl stick on items and work really well. Cheap and effective.
Back to top Go down
Mr. Fisherman

Mr. Fisherman


Lynx Fairing install, WR250X Empty
PostSubject: Re: Lynx Fairing install, WR250X   Lynx Fairing install, WR250X EmptyMon Aug 02, 2010 4:47 am

Ian B wrote:
Mr. Fisherman wrote:
Thanks Ian. I did use lock washers on the wing nuts.
From what I read a lot of people upgrade the bars. I am glad there was enough material to open up the holes.
Now to put some miles on it.

We need to come up with a guard for the lenses.

We already have them. They are 40ml clear vinyl stick on items and work really well. Cheap and effective.

Well I need one and the sooner the better.... Lynx Fairing install, WR250X 379944

By the way... these HIDs.... infriggincreadible! Just got back from my first night ride with them. I can't believe how good they are.
Back to top Go down
Ian B


Lynx Fairing install, WR250X Empty
PostSubject: Re: Lynx Fairing install, WR250X   Lynx Fairing install, WR250X EmptyMon Aug 02, 2010 12:34 pm

[quote="Mr. Fisherman"]
Ian B wrote:
Mr. Fisherman wrote:
Thanks Ian. I did use lock washers on the wing nuts.
From what I read a lot of people upgrade the bars. I am glad there was enough material to open up the holes.
Now to put some miles on it.

We need to come up with a guard for the lenses.

We already have them. They are 40ml clear vinyl stick on items and work really well. Cheap and effective.

Well I need one and the sooner the better.... Lynx Fairing install, WR250X 379944

By the way... these HIDs.... infriggincreadible! Just got back from my first night ride with them. I can't believe how good they are.[/quote

Yeah, and the standard Halogens are not much different either ! Lens protectors in the post.

Ian
Back to top Go down
SteveO

SteveO


Lynx Fairing install, WR250X Empty
PostSubject: I different twist on the Lynx fairing install   Lynx Fairing install, WR250X EmptySat May 28, 2011 3:26 pm

I know this is an older thread, but I thought I would share some different mounting options with the Lynx Fairing.

Since I have a HDB top clamp and a GPR steering stabilizer, the stock location for the Ignition switch was a no-go.

I ended up drilling out the bolts for the Ignition switch and moved the IG switch up higher into the Lynx bracketry. This also means I needed to move the Speedo display up higher. AND, since I have HID lights, I had to find mounting positions for the ballasts, Time delay relays and wiring. The plastic back-piece is pretty rugged, and thus far has done very well in holding my items in place. As you can see from the pic, I've also mounted a Ram-1" Ball mount for my GPS, and mounted the IG switched in easy reach. Thus far, it's working very well. I have room behind the Lynx fairing to adjust the position of the lights if necessary, and the fairing is solidely mounted to the bike, via some custom made brackets. yeah, I know I should paint them and make em look "purty", but I was on a time schedule to get this done, so no paint.

Anyhow, this entire setup house the following:
Lynx Fairing
Mounted to the underside of the Lynx Display section is TWO HID Ballasts, one for Low and one for HI.
Mounted to the underside of the Lynx Display section is TWO Time-Delay relays that delay power to the HID lights after the Ignition is turned on. This prevents a re-strike on the HID lamps.
Mounted to the top side of the Lynx Display section is 1 Triangle size 1" Ram Ball, for mounting accessories. Currently my GPS is mounted on this, and again, its holding up great throug the ups and downs of the trails.
Mounted to the top side of the Lynx Display section is the stock Speedo Display
TO-BE mounted ot the top side of the Lynx Display, just below the Speedo Display will be a small Tach
GPR steering stabilizer
HDB Top clamp
Chubs Fat Bars
Off to the left is a SPOT satellite tracker, mounted up high and out of my body position. When flying down the trail, you body is usually standing up, and leaning forward slighly. Movinig the SPOT further up front ensure a clear satellite signal.

Something else I fixed: In the stock configuration when switching from LOW bean to HI beam, the LOW beam will switch off.
Since I now have two independent lights, I have shorted out the LOW beam to ALWAYS be on. So, when I switch from LOW beam to HI beam, both lights are on, giving more light at night......very nice option......


Lynx Fairing install, WR250X 2011-05-28_12-42-28_891
Back to top Go down
Sponsored content


Lynx Fairing install, WR250X Empty
PostSubject: Re: Lynx Fairing install, WR250X   Lynx Fairing install, WR250X Empty

Back to top Go down
 
Lynx Fairing install, WR250X
Back to top 
Page 1 of 1
 Similar topics
-
» Custom Retractable Windshield
» LYNX FAIRING, WHO'S GOT EM?
» Lynx Fairing
» Lynx fairing on R - Questions
» Britannia Lynx Fairing

Permissions in this forum:You cannot reply to topics in this forum
Welcome to the WRR/X Forum :: Technical :: Sweet Mods & Bike Accessories-
Jump to: